It is possible to change a component location from the Top to the Bottom of the PC board or vice versa. There are 2 common methods to achieve this and they are outlined below.
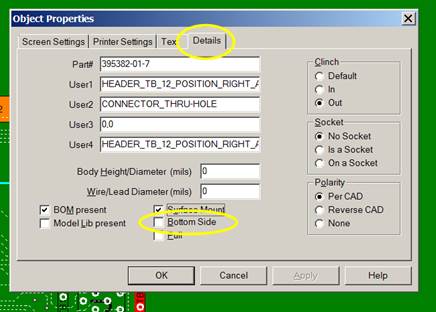
Changing a component to the opposite surface top or bottom: To do this first select the device or devices you wish to change. Next click EDIT then PROPERTIES and the Object Properties window will be displayed. Click the DETAILS tab and at the bottom you will see Bottom Side and when that box is checked that component is on the bottom of the PC board when it's not it's on the top of the PC board. Toggle to the desired state and click OK to save it.
Note: Multiple components can be selected (Ctrl + left click) at the same time and changed however they must have the same number of pins and span but can have different part numbers.
CHANGING A COMPONENT TO THE OPPOSITE SURFACE TOP OR BOTTOM: In certain cases it may be quicker to export a .FBA file and edit the surface indicator in that file and then reimport the .FBA . An example of when it may be faster to do it using this method would be if on a PCB assembly ( PCBA ) you wanted all the components on the bottom moved to the topside. Then in this case you can simply change all the bottom markers in the .FBA file to top side markers with a search/replace and then reimport the editted .FBA file into the Unisoft software.
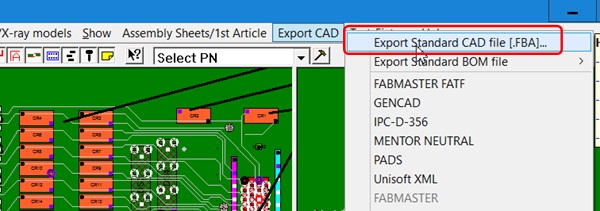
To Use: Click the EXPORT CAD menu at the top of the Unisoft software and then click EXPORT STANDARD CAD FILE [.FBA] and save the .FBA file.
Open the .FBA file just created with any text editor, for example Microsoft Notepad.
Below is an example of a .FBA file. The T and B highlighted in red indicate the top and bottom surface mount markers. In this file components R116 and R117 the surface marker is T so they are on the top side and for R118 and R119 the surface marker is B so they are on the bottom side.
415 - $$$20692 R116 1 X 1.643 Y 1.872 T S
414 - $$$20407 R116 2 X 1.568 Y 1.872 T S
342 - $$$13162 R117 2 X 1.175 Y 2.760 T S
336 - $$$13156 R117 1 X 1.175 Y 2.694 T S
491 - $$$30490 R118 1 X 0.980 Y 3.654 B S
497 - $$$30496 R118 2 X 0.980 Y 3.720 B S
368 - $$$16722 R119 1 X 0.915 Y 3.654 B S
491 - $$$30490 R119 2 X 0.915 Y 3.720 B S
If we wished to have the components R118 and R119 flipped to the top side then we would edit the field marker via search/replace or other editing means for those components changing B to a T as in the example below. When the editing is complete re-import the .FBA file into the Unisoft software.
415 - $$$20692 R116 1 X 1.643 Y 1.872 T S
414 - $$$20407 R116 2 X 1.568 Y 1.872 T S
342 - $$$13162 R117 2 X 1.175 Y 2.760 T S
336 - $$$13156 R117 1 X 1.175 Y 2.694 T S
491 - $$$30490 R118 1 X 0.980 Y 3.654 T S
497 - $$$30496 R118 2 X 0.980 Y 3.720 T S
368 - $$$16722 R119 1 X 0.915 Y 3.654 T S
491 - $$$30490 R119 2 X 0.915 Y 3.720 T S